
Hey there, basement dwellers! Let’s be real—that unfinished basement space can be a total head-scratcher when it comes to making it functional without spending a fortune. I’ve been there, staring at concrete floors and exposed ceiling joists, wondering how to carve out usable spaces without committing to full-blown construction.
After my own basement dilemma (and many, many Pinterest rabbit holes), I’ve pulled together some seriously cool basement room divider ideas that won’t require taking out a second mortgage. These are solutions I’ve either tried myself or have seen work wonders in friends’ homes!
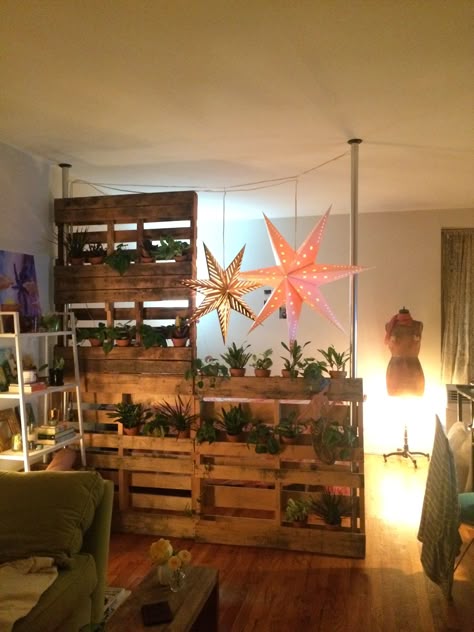
1. Pallet Paradise: The Rustic Room Divider
Pallets are basically the unsung heroes of DIY basement dividers! My buddy Mark transformed his basement last summer using this exact approach, and I was blown away by how professional it looked.
Why it works:
- It’s incredibly budget-friendly (sometimes even free!)
- The rustic wood adds warmth to cold basement vibes
- You can customize the look with stain or paint
- It offers partial privacy while letting light through
How to make it happen:
- Collect enough pallets for your desired wall height and length
- Clean them thoroughly (seriously, who knows where they’ve been!)
- Frame out your divider area with basic 2x4s anchored to the floor and ceiling joists
- Attach the pallets to the frame using screws
- For extra flair, weave string lights through the slats like Mark did
The semi-transparency of pallets makes them perfect for defining spaces without making the basement feel smaller or darker. Mark even left some strategic gaps between his pallets to create little display nooks for his vinyl record collection!
2. Hanging Fabric: The Instant Soft Divider
When my sister needed a quick solution for her craft corner, she went with hanging fabrics—and wow, what a difference it made in softening the industrial basement vibe!
Why it works:
- It’s literally the quickest option (can be done in an afternoon)
- Fabric adds texture and absorbs sound (great for echo-y basements)
- Easy to change when you want a fresh look
- No construction skills required!
How to make it happen:
- Install 1×2 boards directly to your ceiling joists where you want your divider
- Choose your fabric—sheets, tapestries, curtains, or even blankets work great
- Attach using staples for a permanent solution or Velcro for something you can easily change
- For a more polished look, hem the bottoms or add weights to keep the fabric hanging straight
My sister used vintage bedsheets she found at thrift stores, and the patterns bring so much personality to what was once just a concrete dungeon. Plus, when her craft projects get messy, she can just take them down and wash them!
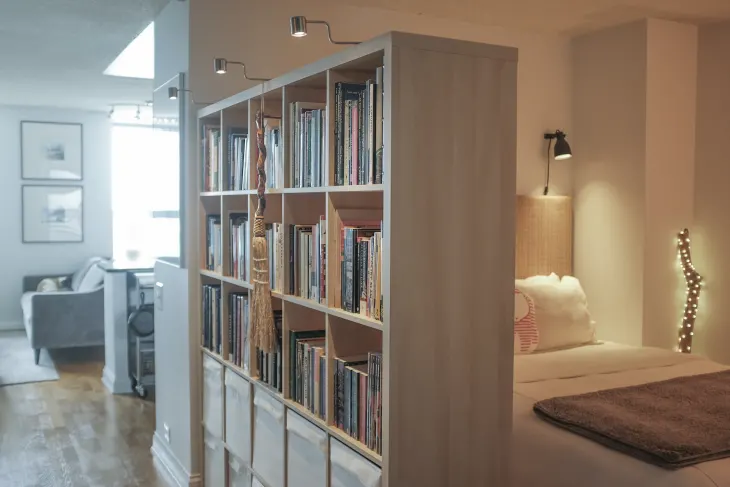
3. Bookshelf Brilliance: Functional Division
This one’s my personal favorite because it solves two problems at once: room division AND storage! When we finally tackled our basement last year, this was our go-to solution.
Why it works:
- Provides substantial visual separation
- Offers tons of storage on both sides
- Can be found inexpensively second-hand
- Looks intentional and designed
How to make it happen:
- Find sturdy bookshelves of your desired height (check Facebook Marketplace or thrift stores!)
- Arrange them in a row where you want your division
- Secure them together side by side for stability
- Anchor to ceiling joists or walls if possible for safety
- Fill with books, storage bins, and decorative items
We found three matching IKEA KALLAX shelves for $30 each and positioned them between our workout area and the kids’ play zone. The cubbies facing the play area hold toys in colorful bins, while the other side stores workout equipment and books. It’s become the backbone of our basement organization!
4. Crate Creation: The Storage Wall
My cousin Tommy came up with this genius idea when he needed to separate his home brewing area from the rest of his basement. It’s like a modern art installation that actually serves a purpose!
Why it works:
- Creates interesting visual texture
- Provides both division and display opportunities
- Can be configured in countless arrangements
- Each crate becomes a useful storage or display nook
How to make it happen:
- Collect wooden crates from craft stores, wine shops, or online
- Plan your arrangement—staggered patterns work well for stability
- Secure crates to each other using screws or heavy-duty zip ties
- Anchor the entire structure to the floor or ceiling for safety
- Use some crates for storage and leave others open for display
Tommy stained his crates different shades of brown and gray for an intentional design statement. The open nature of this divider means light still flows through the space, which is crucial in basements with limited natural light.
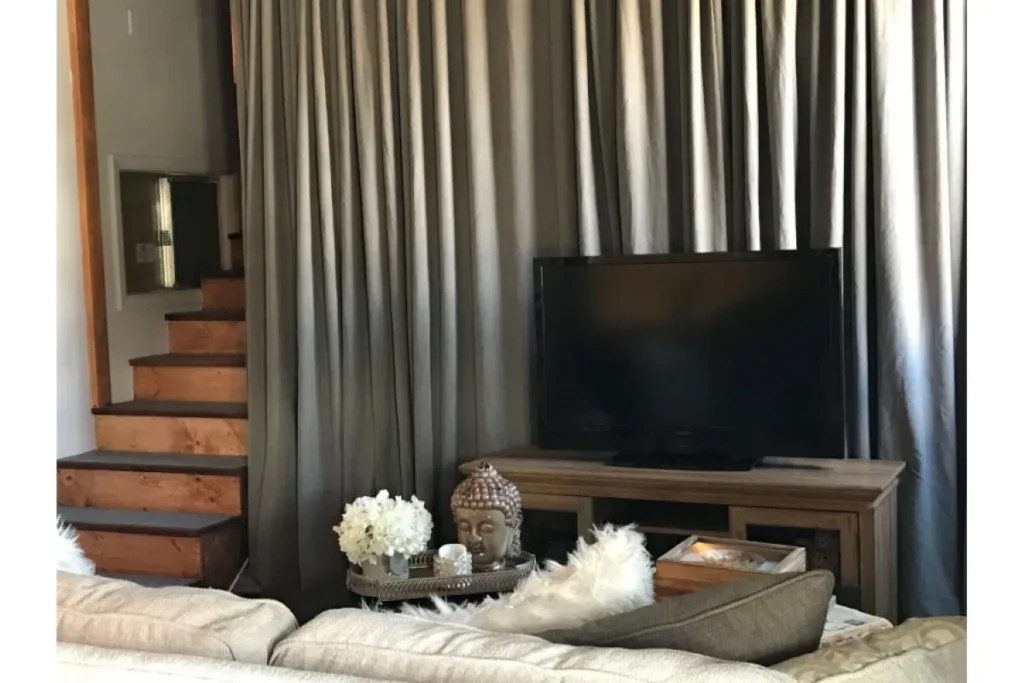
5. Curtain Divider: The Flexible Solution
When we needed a quick solution for my teenager’s basement bedroom area, curtains saved the day. They’re perfect when you need the option to completely open up the space occasionally.
Why it works:
- Provides complete privacy when needed
- Can be pushed aside for open-concept feel
- Adds softness to hard basement surfaces
- Available in endless colors and patterns to match your style
How to make it happen:
- Install curtain rods or wire directly to ceiling joists
- Choose floor-length curtains or hemmed sheets
- Use curtain clips for easy installation and removal
- Add tie-backs on walls if you’ll frequently want them open
We went with simple drop cloths from the hardware store (about $15 each) for our curtains—they have a lovely linen-like texture and were already the perfect color for our space. For a recent family gathering, we simply tied them back, and voilà—one big open space again!
6. Creative Cabinet Arrangement
My neighbor Jan had a stroke of genius when she repurposed old kitchen cabinets as a basement divider during her kitchen renovation. Talk about sustainable design!
Why it works:
- Provides substantial division
- Offers massive storage potential
- Can be found for free or cheap during renovations
- Looks like intentional built-in furniture
How to make it happen:
- Source cabinets (kitchen renovations, ReStore, online marketplaces)
- Arrange in your desired configuration
- Secure cabinets to each other and anchor to floor/ceiling for stability
- Add a countertop for a finished look
- Paint or refinish to match your style
Jan created a back-to-back arrangement with cabinets facing both spaces, essentially building a storage wall that serves her craft area on one side and a small home gym on the other. The countertop section doubles as a folding table for laundry!
7. Stone and Wood Accent Wall
For those willing to invest a bit more time and money, this statement divider combines practical division with serious style points. My brother-in-law Scott created one that still makes me jealous every time I visit!
Why it works:
- Creates a substantial, permanent-feeling divider
- Adds major design appeal to unfinished spaces
- Can incorporate functional elements like shelving
- Makes the basement feel like an intentional living space
How to make it happen:
- Frame out a basic wall structure with 2x4s
- Instead of complete drywall coverage, use it selectively
- Add stone veneer, brick, or tile accents in strategic areas
- Leave recessed areas for shelving or display niches
- Incorporate elements that allow light to pass through the upper sections
Scott’s version has drywall on the bottom half, stone veneer accents, and open shelving on top. The shelves serve as both display space and allow light to flow between the areas. It’s the perfect balance of division and connection!
The Bottom Line
Your unfinished basement has so much potential, even without finishing all the walls and ceilings! These divider ideas let you create functional spaces while keeping your options open for future renovations. The best part? Most can be implemented in a weekend without specialized skills.
I’d love to know which of these ideas speaks to you, or if you’ve found another creative solution for your basement challenges!
Leave a Reply